Confirm a scheduled appointment only after a client has submitted an intake form.
Assign the Form to the Service
Click Bookings → Booking Settings.
Select the Services tab.
Locate the service and click Edit.
Select the Form tab on the left.
Select an intake form from the Choose an intake form for this service dropdown menu.
Check the boxes for the following:
Send form even if client has filled it out before.
Default form when booking services for new appointments
Send form before appointment is confirmed
Click Save.
Set the Appointment Confirmation Method
Click Bookings → Booking Settings.
Select the Services tab.
Locate the service and click Edit.
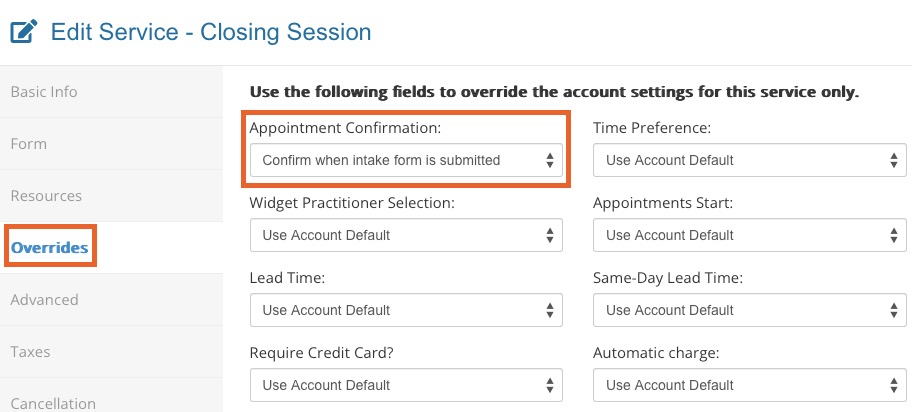
Select the Overrides tab on the left.
In the Appointment Confirmation field, select Confirm when intake form is submitted from the dropdown menu.
Click Save.
Important Notes About the Override
When the client schedules, PracticeQ will still block time on your calendar to ensure you cannot be double-booked.
The appointment will be booked but not confirmed until the client has submitted their intake form.
The form will be added to the end of the booking process.
The form will always send when this service is booked, even if you have not selected Send form even if client has filled it out before. PracticeQ will be required to send the form in order to automatically confirm the appointment.
What Your Client Will See
At the end of the online booking process, your client will be notified that their appointment is pending confirmation upon submission of the intake form that was sent to them.
The client can click the Open Intake Form button to access the form.
The client will need to retrieve the form access code from their email to complete it, or they can choose to complete it later from the email they were sent.
.png)