.png)
Send Forms and Emails Using Your Email Address
Send forms and emails to clients using your own email address instead of using our default IntakeQ email.
Note: If you set up a custom mail sender following the instructions below, please be aware that the following emails will continue to send from app@intakeq.com:
This is what your clients see when they receive emails you send from IntakeQ/PracticeQ:
- Staff password reset emails
- Secure client portal password reset emails
Subject: Dr. Smith has sent you an intake form
Subject: Please fill out this intake form
- Your clients will be more likely to open the email if it comes from your address.
- It now makes more sense to customize your email template and use a more personal welcome message, since it will be coming directly from you.
- Your client does not need to know about IntakeQ. If they have a question, they can just hit reply and the email will go directly to you.
IMPORTANT: This feature does not work with public email providers like Gmail, Hotmail, Yahoo, etc. You will only be able to use it if you are using a "private" domain (e.g. contact@drsmith.com).
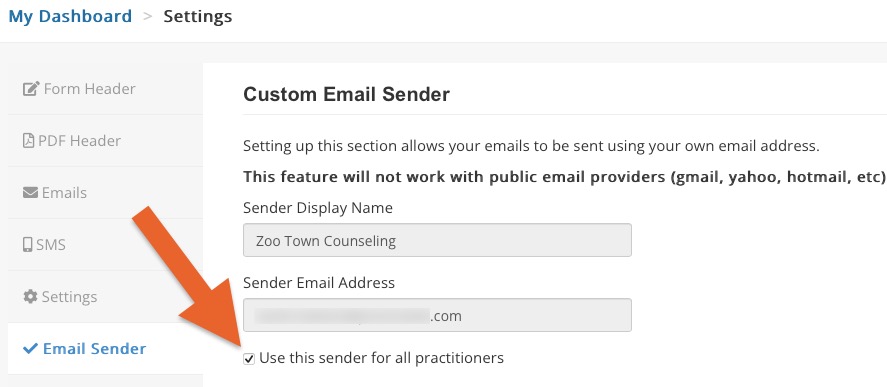
Set Up Your Email Sender
- Click More → Settings → Email Sender.
- Enter the Sender Display Name and Sender Email Address you wish to use.
- Check Use this sender for all practitioners if applicable. This option will only appear in the admin account. Read more about how this setting works in Email Sender in the Admin Account below.
- Click Save.
- Go to your email inbox and look for an email from app@intakeq.com. Click the link provided to confirm your email.
- Return to PracticeQ and click the Refresh button to make sure the email sender reflects as confirmed.
Steps 5 and 6 authorize PracticeQ to send your intake forms using your email address without being flagged as spam.
Additional Authentication
- There are additional authentication methods you can setup to prevent your emails from hitting client spam filters.
- These additional authentication methods (DKIM, Return-Path, and SPF) are a bit more technical and may require the assistance of someone who is comfortable editing DNS settings on a domain name.
- You will find the DNS information to provide to your domain tech under More → Settings → Email Sender, at the bottom of the page.
- You will first have to set the records on your domain's DNS, then click the Verify buttons to activate each.
- If you are not familiar with DNS records, this website does a great job of finding specific instructions for your DNS provider: https://dnshelp.stunning.co
- We offer this help article that provides the DNS settings for common email domains: Update Your DNS Records.

TROUBLESHOOTING
- Some systems append your domain name at the end of the DKIM hostname. This will often prevent PracticeQ from being able to verify the address.
- If you are having trouble verifying one of the records above (usually the DKIM), please email us at hello@intakeq.com; sometimes we need to manually validate it.
Email Sender in the Admin Account
By default, the email sender in the Admin account is applied to all practitioners in the account. This setting does the following:
- If checked, the admin email sender is always used. Even if a non-admin practitioner sets up the email sender, the admin's email sender will be used instead.
- If unchecked, non-admin practitioners can set up their own email sender, and the system will use it for all emails sent from that practitioner's account.
- Note for admin-only accounts: When you send emails, it is based on the practitioner you send it from. As an admin-only, you do not take action on behalf of yourself, but rather on behalf of a practitioner. Thus, even though you are sending the email, if you send a form from a practitioner, then the form sent from that practitioner's account will use their email sender.