.png)
Create an Invoice
There are six ways to create an invoice in PracticeQ.
Behind on invoicing? Learn how to add uninvoiced sessions here.
Option 1: Create an invoice manually in the Client Profile page
- Click Lists → Clients.
- Select the Invoices tab. You will see all invoices tied to the client.
- Click Create Invoice. This will open a fly-out window with the invoice information.
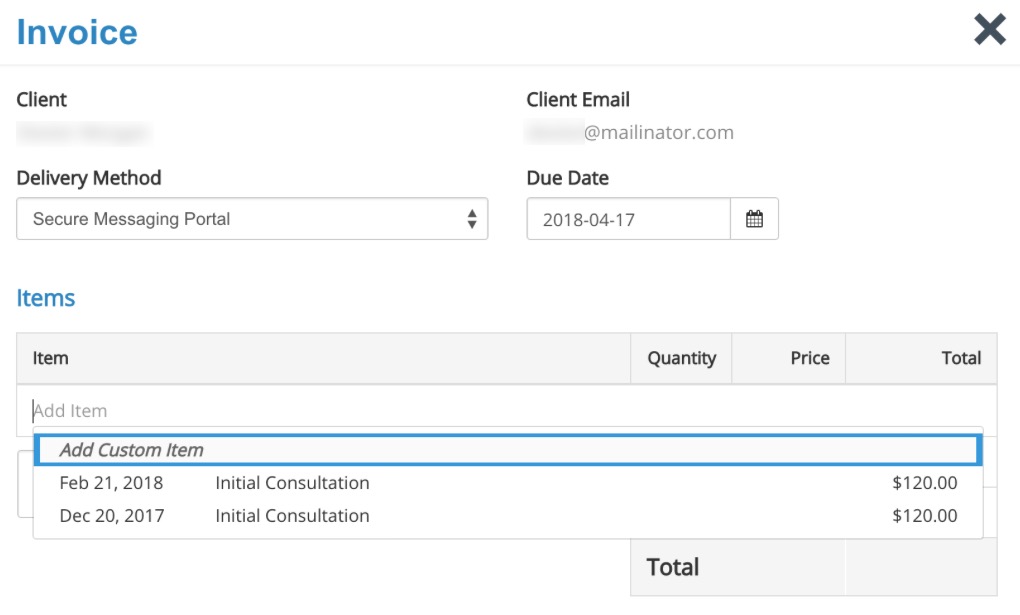
- Place your cursor in the Add Item field; a dropdown list will display any uninvoiced appointments for that client.
- Select one or multiple appointments to apply to a single invoice.
- You may ignore the list of appointments and type the invoice item. This is useful for charging other items, like products or extra fees.
- Click Save Invoice.
- If the invoice is ready to be delivered, click Issue Invoice.
- A confirmation window will display.
- Click Issue Invoice if you do not need to make changes.
- Click Delivery Options if you wish to change the delivery method and/or the default email template.

Note: PracticeQ can also send invoices via the Secure Messaging Portal (recommended) or not send the invoice at all. After the invoiced is issued, you can also share it with a client using a secret URL.
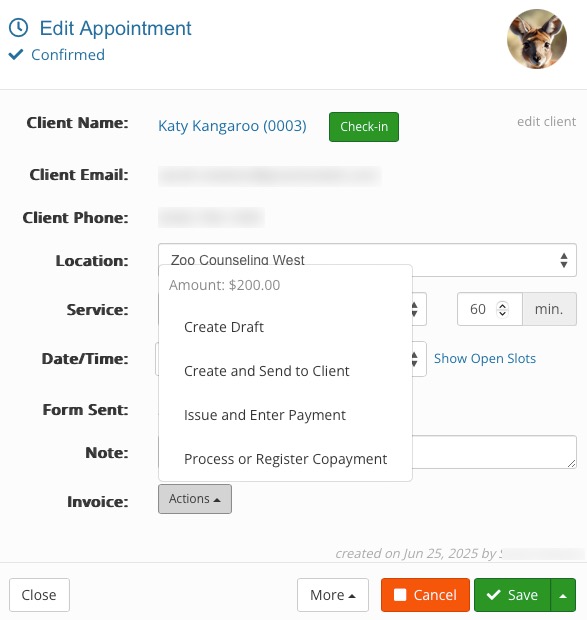
Option 2: Create an invoice manually in the Appointment Details dialog
- Click Bookings and select the client's appointment.
- If the appointment is uninvoiced, the Invoice dropdown menu will be available.
- The Create Draft option allows you to make changes to the invoice before it is issued.
- The Create and Send to Client option creates the invoice and opens the Issue Invoice popup, giving you a chance to change the delivery method and/or default email message before confirming.
- The Issue and Enter Payment option issues the invoice AND opens a popup that allows you to enter payment information. You can process Credit Card, Cash, Check, Debit Card, Bank Transfer, Insurance, Gift Card or Other payments.
- The Process or Register Copayment option issues the invoice AND opens a popup that allows you to enter information for payments outside of PracticeQ. You can process Credit Card, Cash, Check, Debit Card, Bank Transfer, Insurance, Gift Card or Other payments.

Option 3: Create an invoice manually in the Appointment List page
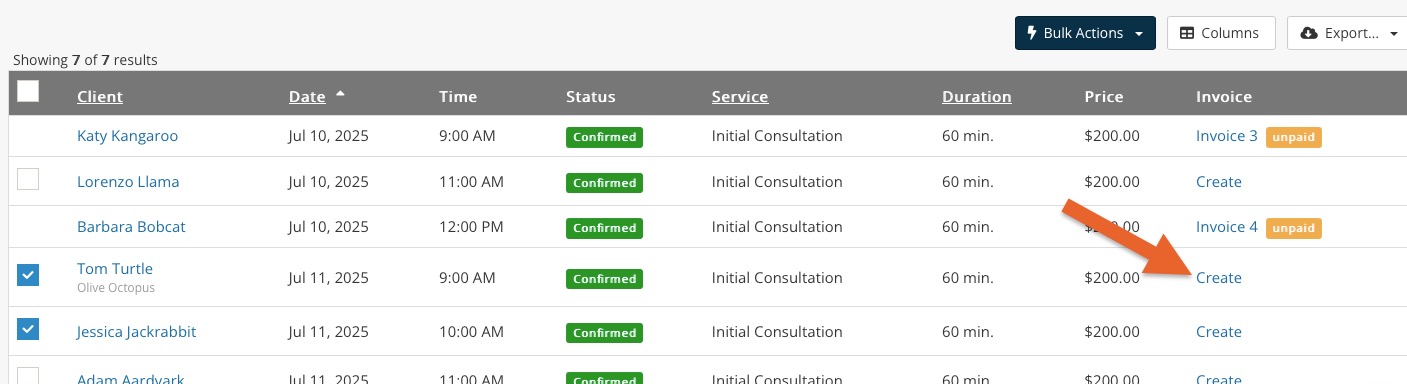
- Click Lists → Appointments.
- Find the appointment on the list and click Create in the Invoice column.
- To create invoices for a group of appointments, check the checkboxes for all uninvoiced appointments and click Bulk Actions → Create Invoices.

Option 4: Create an invoice manually in the Packages page
- Click Bookings → Packages.
- Locate the package and click Add Invoice.

Option 5: Create an invoice automatically when an appointment Is auto-charged
PracticeQ will automatically create an invoice for payments in the following situations:
- When a client uses your booking widget and pays upfront
- When appointment auto-charge is enabled
Option 6: Create an invoice automatically when a deposit is paid
- If a service or package requires that a client place an upfront deposit when booking an appointment, that deposit will create an invoice automatically.
- The total amount of this invoice will be the full amount of the service or package.
- The deposit will be registered as a payment, leaving the remaining balance as the amount due.