.png)
Use Client Tags
Tagging clients makes it easy to categorize them and have access to information by quickly glancing at their records.
You can tag a client manually or automatically.
1. Tag a Client Manually
You can tag a client from the client profile or when viewing the client's intake form.
From the client profile:
- Click Lists → Clients and open the client's profile.
- Click the Tag icon and start typing the name of the tag.
- If the tag already exists, select it from the list. Otherwise, press Enter after you type the tag name.
- Once added, a client's tags will display next to their name.
- To change the color of a tag, click on it to pull up the Edit Tag window.
- Click Save.

From an Intake Form:
- Click Lists → Intakes and open the Intake Form.
- Locate the Client Tags section to the right side of the form.
- Click the + icon and start typing the name of the tag.
- If the tag already exists, select it from the list. Otherwise, press Enter after you type the tag name.

- Click Bookings.
- Create the appointment for the client.
- In the appointment dialog, click edit client.
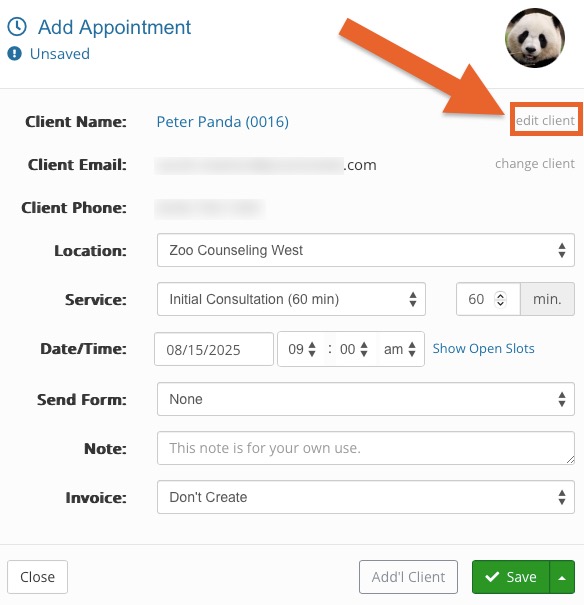
- In the next window, click the plus sign next to Client Tags on the lower left.
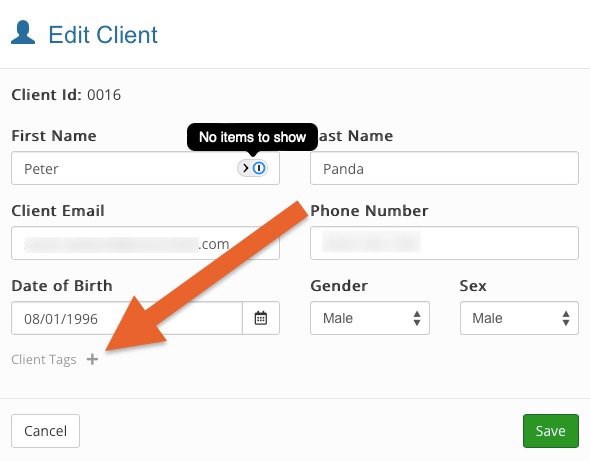
- Type the name of the tag you wish to add.
- Select the tag from the list that populates.
- The tag will appear under the Client Tags heading.
- Repeat to add more tags, if needed.
- Click Save.


2. Tag a Client Automatically
Just as you can use conditional rules for skip logic, you can also use them to create rules that tag clients automatically in your Intake Forms.
Create a Tagging Rule:
- Click My Forms and open the Intake questionnaire to which you wish to add the rule.
- Click the three dots icon and select Rules.
- Click Add Rule.
- Complete the 4 rule steps. Note that in step 3, in the THEN field, you will prompt the system to automatically tag the client.
- Click Save.
See the image below for an example.
Note: Tags will only appear here if they have been manually created previously.

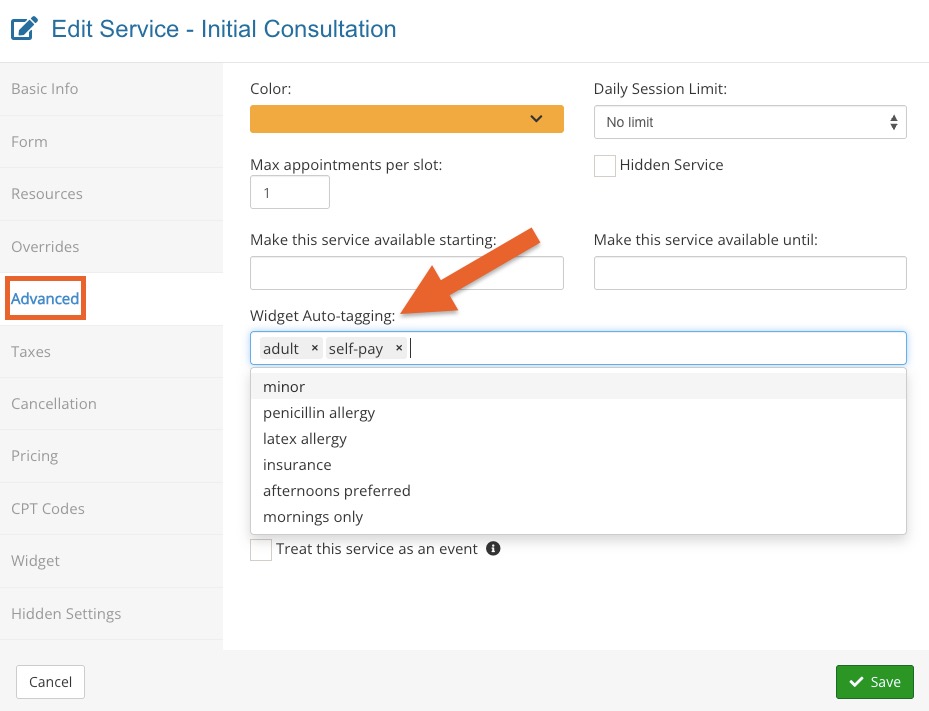
Set up Widget Auto-Tagging:
- Click Bookings → Booking Settings.
- Select the Services tab.
- Click Edit for the service to which you want to set up auto-tagging.
- Select the Advanced tab on the left.
- In the Widget Auto-Tagging field, select the tag/tags you wish to apply to clients when they schedule the service.
- Click Save.
Automatically remove a client tag in the same way - by using rules in your intake forms.
Create a Remove Tag Rule:
- Click My Forms and open the intake questionnaire to which you wish to add the rule.
- Click the three dots icon and select Rules.
- Click Add Rule.
- Complete the 4 rule steps, selecting remove tag(s) from client for Step 3.
- Click Save.
Note: If you tell the system to remove a tag that was not previously applied, the system will see that the tag is not currently active and ignore the rule, as it will not apply.