.png)
Task Automation (Processes)
PracticeQ is here to help you create, automate and track tasks efficiently.
If you are not familiar with our Task Management module, we recommend that you read the following article first: Task Management.
What is a Process Template?
A Process Template is a set of tasks triggered by an event, such as when a client schedules a specific appointment.
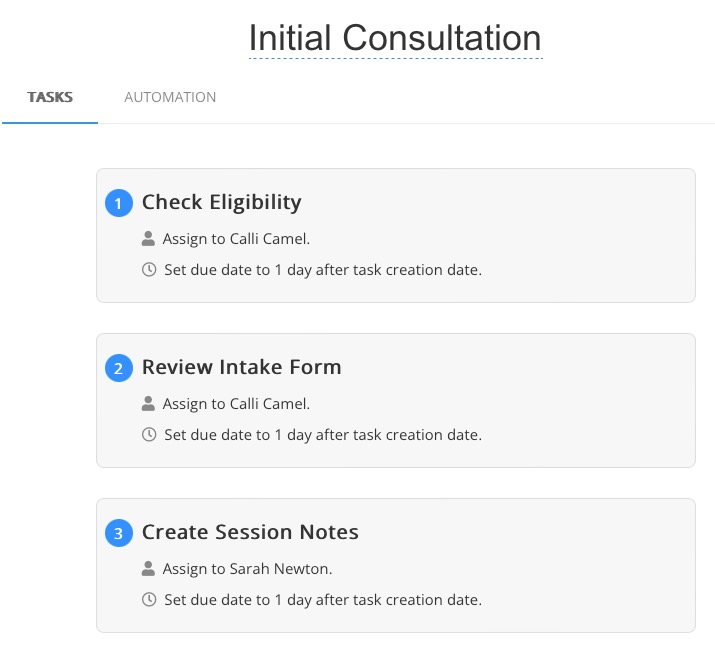
Create a Process Template
- Click More → Processes.
- Click the green +New button.
- The process title will default to Untitled. Click on the title and type the title you want.
- Click the checkmark button to save the title.
- Under the Tasks tab, click the +Add New Task button. Enter the first task associated with the process.
- In the Task options, here are some important fields to know about:
- Assignment Type: Indicate who the task should be assigned to. You can assign it to the practitioner who owns the client, a specific user (practitioner or assistant), or the practitioner who is associated with the event that triggers this process. For example, if a process is triggered by an appointment that was booked, the practitioner associated with the appointment will be the assignee of this task. Additionally, you can set this task to be assigned to anyone, which will leave the task unassigned.
- Dynamic Due Date: Indicate how the due date for a task should be determined. This can be based on 2 factors:
- Task creation date: This tells the system to set the due date based on the date that the event was triggered. In the example of an appointment being created, it will base the due date on the date that the appointment was created. It allows you to create rules like "set due date to 12 hours after the appointment was booked".
- Task source date: In this case,the source of a task is the object that triggered the process. In the case of a process that is triggered when an appointment is created, the source object is the appointment, and the source date is the date of the appointment. Use this option if you want to create a task that is due based around the appointment date/time. For example, "this task should be due 2 hours before an appointment".
- Repeat until all tasks are entered.

Set Up Automation
- Select the Process Template you just created from the Templates list on the left.
- Select the Automation tab.
- Click the +Add New Trigger button.
- Enter the Trigger - what event will kick off the task list? You have several options, such as when Appointment is created, when Appointment is missed, and when Recurring Payment fails.
- Under Conditions, select the Practitioners to apply to the process template.
- The third field may be Services, Forms, or Notes, depending on the trigger selected. If necessary, select the specific appointment type, form or note to which the process applies.
- Click Save Automation.

Track Automations
- Once you have set up your automations, PracticeQ will create tasks automatically based on the triggers you defined.
- Depending on the level of activity in your practice, you may end up with dozens or hundreds of pending tasks in your list. To help you navigate them, we display tasks in convenient spots, such as in the client profile or on the object that triggered the process.
- Click the tasks link to open the task list fly-out showing only the specific tasks associated with this appointment.

