.png)
Export Your Data from PracticeQ
Below is your guide for exporting all of your data from PracticeQ.
Export All Clients
- Click Lists → Clients.
- Click the Export Clients button below the Search button.
- Select Export All Clients.
- A CSV file download will begin with your client details.
Export Specific Clients
- Click Lists → Clients.
- Enter your Filter criteria and click Search.
- Once your client search is complete, click the Export Clients button located below the Search button.
- Click Export Search Results.
- A CSV file download will begin with your client details.
Export a Client's Files to PDF
To export all files (all notes, or all intakes, or both) for a specific client, follow the steps below:
- Click Lists → Clients.
- Use the search filter options to locate the client, then click the blue Open button.
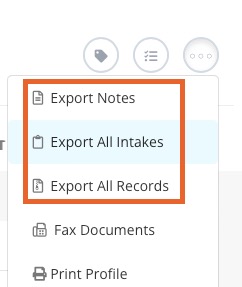
- Within their profile, click the three dots icon.
- Select one of the export options:
- Export Notes
- Export All Intakes
- Export All Records

Export Appointments to CSV
To export a list of appointments to CSV (or Excel), follow the steps below:
- Click Lists → Appointments.
- Complete the search filters and click Search.
- Click Export → Export to CSV.
- A CSV file download will begin with your appointment details.
If you require a per-client summary you will see that option as well. Read more in the following article: Per-Client Appointment Summary.
Export Claims to a CSV
See the varying export types below and how to download them.
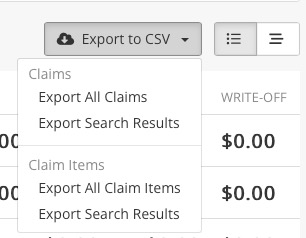
Export from Claims View
To export a CSV list of your claims, following the steps below:
- Click Lists → Claims.
- Complete the search filters to narrow the results.
- Click Export to CSV and select one of the export options.

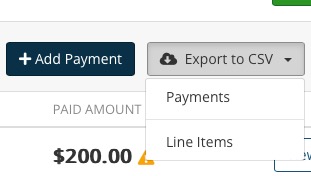
Export from Payments View
To export a CSV list of your claim payments, follow the steps below:
- Click Lists → Claims.
- Click the Payments button to change the view.
- Complete the search filters to narrow the results.
- Click Export to CSV and select one of the export options.

Export from Appointments View
To export a CSV list of your claims with associated appointment details, following the steps below:
- Click Lists → Claims
- Click the Appointments button to change the view.
- Complete the search filters to narrow the results.
- Click the arrow next to the Search button and select Export to CSV.

